Tissue Clearing
Based on recent publications, we established a fast and reproducible strategy for tissue clearing at ZMB. Main advantages of this method are:
- compatibility with tissues from various origins
- preservation of endogenous fluorescent proteins in the tissue
- compatibility with immunostaining.
ZMB is providing the lab space with the necessary equipment for clearing workflow which can be used autonomously by all users after training and introduction.

CONTENTS
ELECTROPHORETIC TISSUE CLEARING
REFRACTIVE INDEX MATCHING AND MOUNTING
TISSUE PREPARATION
1. Organs, harvested directly or after perfusion, should be placed immediately into 4% FA fixative solution overnight at 4˚C.
It is important to have at least ×25 excess volume of fixative in relation to the total volume of tissue (Dempster, 1960). For example, for the whole mouse brain a 50ml falcon tube filled with at least 25ml of FA solution could be used; for the whole mouse kidney a filled to the top 15ml falcon and for zebrafish brain 2ml eppendorf tube is sufficient.
Overnight fixation is enough for most of the perfused tissues. In case of thick tissues without prior perfusion, this time should be extended.
Contact us for equipment at cold rooms.
Note: Over-fixation leads to an increased autofluorescence and impedes the further clarification process. Under-fixations leads to morphological distortions and protein loss.
2. After the tissues were fixed, they could be sectioned when needed.
For the sections from 100μm in thickness the vibrating blade microtome is available.
There is no need in proceeding further with samples larger than the volume intended to be imaged.
HYDROGEL TISSUE EMBEDDING
1. Prepare fresh hydrogel monomer solution.
2. Place fixed organs, or organ slices to the appropriate volume of the hydrogel monomer solution. Transfer the tubes to the shaker at 4˚C for ~12-24 hours to allow even distribution of monomer and initiator molecules throughout the tissue.
Note: It is best to fill the falcon tubes to the top at this stage, when done so the degassing step is not necessary.
Note: Uniform penetration of monomers throughout the tissue is critical for 1) even polymerization throughout the tissue and 2) keeping the macro- and microstructure of the region of cellular structures that are not infiltrated with monomers may not be bound to the hydrogel mesh even after hybridization, and subsequent electrophoresis will result in loss of the unbound biomolecules. Furthermore, uneven distribution of monomers may cause anisotropic expansion and reduction in volume during the electrophoretic tissue clearing and refractive index matching steps.
3. Place the samples in a 37°C incubator for 3 hours without shaking for hydrogel polymerization.
4. After polymerization wash the samples in clearing solution at RT with gentle shaking overnight.
Note: SDS in clearing solution precipitates at 4ºC
ELECTROPHORETIC TISSUE-CLEARING (ETC)
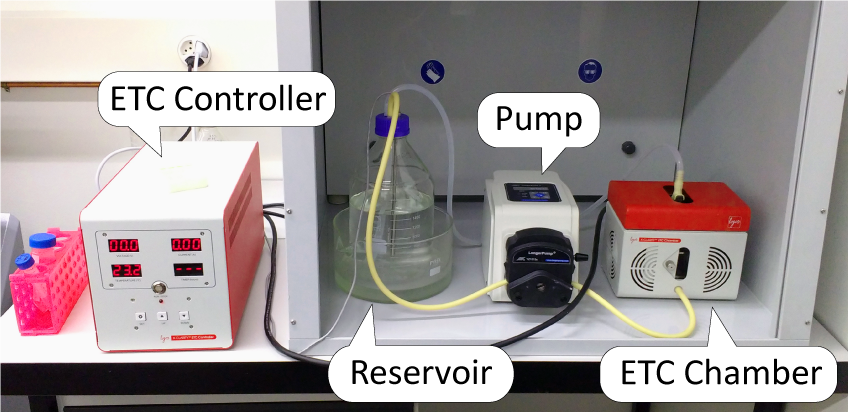
ZMB Tissue Clearing Platform provides its users access to the X-CLARITY Electrophoretic Tissue Clearing (ETC) System.
The ETC system is an all-in-one, easy-to-use solution for electrophoretic tissue clearing, it consists of the:
- ETC Chamber: where the sample is placed for clearing;
- ETC Controller;
- Pump;
- Reservoir: a 2L bottle with the clearing solution.
1. Fill the reservoir bottle with 1.6L of fresh clearing solution.
2. Turn on the pump on and fill the ETC Chamber to approximately half.
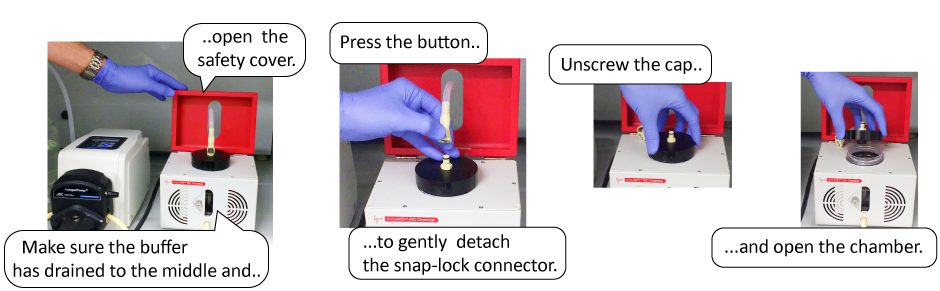
3. Stop the pump. Remove the snap-lock connecter tube from the ETC Chamber outlet, open the safety cover, and unscrew the chamber cap.
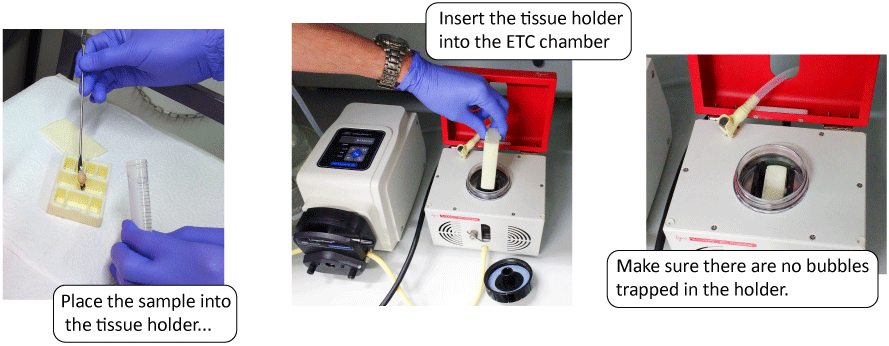
4. Place the tissue sample into the suitable holder.
5. Insert the tissue holder into the ETC Chamber. Make sure there are no bubbles trapped in the holder.
6. Screw on the chamber cap tightly. Connect the snap-lock connector end of the silicone tube to the chamber outlet.
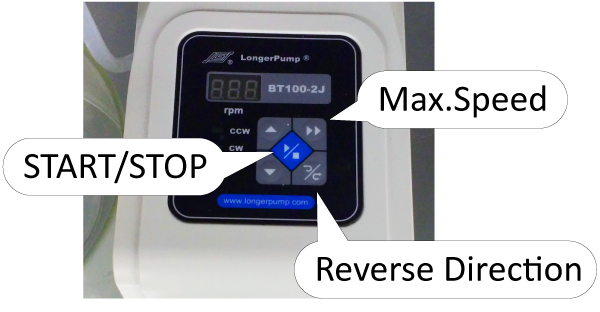
7. Turn on the peristaltic pump to the maximum speed to begin to circulate the clearing solution. Adjust the flow rate of the pump to 30 rpm when the ETC Chamber has been filled by circulation of the clearing solution.
8. Set the values on the ETC Controller for current, temperature, and switching time and press RUN.
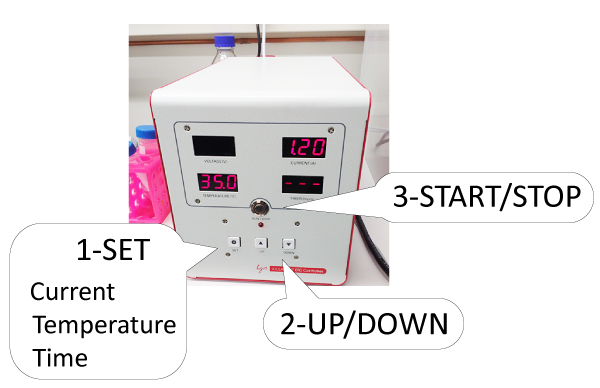
9. Set the values on the ETC Controller for current, temperature, and switching time and press RUN.
For successful lipid removal and preservation of tissue morphology, it is important to tune the clearing parameters to tissue properties and dimensions. Current settings will need to be optimized based on the sample holder, how many samples are stacked together and desired clearing speed. Clearing time will depend on various factors such as the number of samples being cleared and tissue type.
| Tissue (mouse) | Clearing time, hour | Current setting, Amper |
|---|---|---|
| whole kidney | 20 | 1.5 |
| kidney 1-3mm slice | 8 (12) | 1.5 (1.2) |
| whole brain | 6-8 | 1.5 |
| brain 2-3mm slice | 2-4 |
1.2 |
| whole heart | 8-12 | 1.2 |
The ETC Controller provides maximum 60 V and 1.5 A. When the current does not reach the set value or/and the voltage is close to 60 V during first ~15min, it is advisable to lower the value of current setting by 0.2 A. If not done so overhearing occurs, despite the temperature setting.
Note: It is the best to check for the completion of clearing by checking for transparency across the tissue every 1-2hrs.
Exchange at least 400 ml of clearing solution after 24 hours of running.
10. Stop the run by pushing the RUN/STOP button on the ETC Controller. Check to see that the voltage and current values are at 0. Reverse the direction of the pump (CW to CCW OR CCW to CW). The draining of the solution can be observed through the window of the ETC Chamber.
11. Remove the snap-lock connecter tube from the ETC Chamber outlet, open the safety cover, and unscrew the chamber cap. Carefully take the sample holder out.
12. Stop the clearing process by washing samples in PBST
IMMUNOSTAINING
1. For immunostaining, make sure that clearing solution is completely washed out. Change PBST at least 3 times.
2. Transfer the slices to the primary antibody dilution in PBST.
3. Incubate at least 3-14 days on the shaker at 37°C.
4. Wash in PBST overnight. Change PBST at least 3 times.
5. Transfer the slices to the primary antibody dilution in PBST.
6. Incubate at least 3 days on the shaker at 37°C.
7. Wash in PBST overnight. Change PBST at least 3 times.
Contact us for further support/discussion concerning immunostaining and labelling with fluorescent markers.
REFRACTIVE INDEX (RI) MATCHING AND MOUNTING
Place the samples in a volume of mounting medium that is sufficient to cover the sample completely and allow it to incubate at least ~6 hours on shaker at 37°C.
For large samples, e.g. mouse brain, refresh the mounting medium and incubate on shaker at 37°C.
We suggest ~88% Histodenz solution in PBS as mounting media (Yang et al., 2014; Treweek et al., 2015): Sigma Aldrich cat. no. D2158
Other available refractive index matching solutions:
FocusClear (CelExplorer Lab, cat. no. FC102)
sRIMS (70% sorbitol solution as per Yang et al. (2014); Sigma Aldrich cat. no. S1876)
2, 20 Thiodiethanol (60% solution, vol/vol as per Zheng and Rinaman (2015); Sigma Aldrich cat. no. 166782)
Glycerol (80 - 87% solution, vol/vol; Sigma Aldrich cat. no. G5561)
Contact us for equipment to check the refractive index of a mounting medium.
REAGENTS
PBS: 0.02M phosphate buffer pH 7.5.
4% FA: 4% Paraformaldehyde in PBS.
For reproducible results always prepare fresh before use from 10% stock.
Hydrogel Monomer Solution: 4% acrylamide and 0.25% VA-044 in PBS.
Acrylamide solution (40% (wt/vol); Bio-Rad, cat. no. 161-0140)
Polymerization thermal initiator VA-044 (Novachem cat. no. 017-19362 or Wako, cat. no. VA-044)
Always prepare fresh monomer solution in the fume hood, wearing gloves, lab coat and safety glasses. For 50ml combine 5ml of 40% acrylamide stock solution, 125mg of VA-044 and 45ml PBS in a precooled falcon tube on ice.
Clearing solution: 200mM SDS in 200mM Boric Acid.
SDS (Sigma-Aldrich, cat. no. L3371)
Boric Acid (Sigma-Aldrich, cat. no. L185094)
Always prepare clearing solution in the fume hood, wearing gloves, lab coat and safety glasses. For 2L combine 24.7g of Boric Acid and 80g of SDS in ddH2O, adjust pH to 8.5 using NaOH.